
|
#106
 03-01-2009, 05:02 PM
|
||||
|
||||
|
Quote:
That would work, and be SOOOOOOOOOOOOO dayum easy on us at home !!!
__________________
Her badonkadonk ........ nuff said !!!                     States I've ridden my scoots in: 
|
|
#107
03-01-2009, 05:03 PM
|
||||
|
||||
|
Quote:
__________________
Her badonkadonk ........ nuff said !!! States I've ridden my scoots in:
|
|
#108
03-01-2009, 05:26 PM
|
||||
|
||||
|
Quote:
__________________
 Chris RIP MONGOOSE   2002 RK Police 95 Big Bore Kit, Weisco Flat Top Pistons, 9.13:1 Engine built by Wilsons of E-town,KY Vance and Hines Ovals SE Air Cleaner, K&N Filter 2006 HD Stock Heads Andrews 26G Cams Dyno'd by ENGINES BY OTTO       851st ARMY SECURITY AGENCY - Europe - 74-77   Last edited by Sonic; 03-01-2009 at 05:45 PM.
|
|
#109
03-01-2009, 05:59 PM
|
||||
|
||||
|
Quote:
Ya Skimmer !!  I'm sure I've NEVER done this before .... but I've received a TON of support from Harley and Paul and Warren, and Steve, and dayum I knew I should start brining up names ...... and ALL THE REST of the guys that have been helping me !!! Without that, I wouldn't be this far along. AND, feeling really good about it too  weather is bad here for the next few days, so I already called one of my customers and told him that I'd not be working his job tomorrow ..... so it looks like I'm in the garage most of the day tomorrow pics to come ... 
__________________
Her badonkadonk ........ nuff said !!! States I've ridden my scoots in:
|
|
#110
03-01-2009, 06:15 PM
|
||||
|
||||
|
Sounds like tomorrow is going to be a busy day in the garage Mikey! Looking forward to some more pics and another progress report.

|
|
#111
03-01-2009, 07:00 PM
|
||||
|
||||
|
Quote:

__________________
Chris RIP MONGOOSE 2002 RK Police 95 Big Bore Kit, Weisco Flat Top Pistons, 9.13:1 Engine built by Wilsons of E-town,KY Vance and Hines Ovals SE Air Cleaner, K&N Filter 2006 HD Stock Heads Andrews 26G Cams Dyno'd by ENGINES BY OTTO 851st ARMY SECURITY AGENCY - Europe - 74-77
|
|
#112
03-02-2009, 09:08 PM
|
||||
|
||||
|
Quote:
__________________
Her badonkadonk ........ nuff said !!! States I've ridden my scoots in:
|
|
#113
03-02-2009, 09:24 PM
|
||||
|
||||
|
Alrighty Then !!!
More progress on the build .... got the pistons ringed, installed into the cylinders, put the cylinders on the bike, put the heads on the cylinders, torqued them down, started the install of the intake manifold .... first use a sharpie to mark the direction of the arrow that's on the top of the cylinder ... Nice tip from my Good Friend Harley ! Thanks Harley !  here's the rear cylinder, upside down, the piston (with rings installed) and the ring compressor. I oiled all of the rings before I installed them, then I put assembly lube all the way around the piston. Starting from the 'top' of the piston and going down to the space below the oil wiper. I also put assy. lube inside the ring compressor to make it easy to knock the piston out of the compressor. I didn't get any shots of that process ... messy hands for sure .... I used the wooden end of a plastic dead blow hammer to tap on the inside of the piston to drive it down into the cylinder. You have to pay attention to how far you put it into the cylinder.... leave enough room for the wrist pin to clear ....  Here's the piston in the cylinder .... arrow pointing to the left (front) ....  here you can see that there is room for the wrist pin to clear  just for the fun of it, I took a shot down into the cylinder ... you can see that the arrow is pointing to the front ..... the cut-out in the side of the cylinder is the space used by the push rods ....... I know all you wrenches already know all this stuff .... I'm just trying to help the guy, like me, who's never done it before.  here's the cylinder with the piston installed and sitting 'upright' you'll notice that I've installed the wrist pin into the piston already. Thanks Steve for that tip !! Install it just short of the entry for the connecting rod .... this way you won't have to stop after you put the cylinder down over the studs and try to find the wrist pin, or pick it up from somewhere. In the photo, it might look like it, but it's not, .... that the cylinder is sitting down on the top edge of the wrist pin .... it's not  EDIT: Don't do like I did (I got lucky) I FORGOT to stuff some rags in the crank case holes so as not to drop anything in there.....like a cir clip here's the rear one on, wrist pin installed (more on this in a minute) and getting ready to install the cir clip.  cir clip being installed ..... see my earlier post on this .... once you get that idea down, it's EASY ..... Not one of them went FLYING!!!  then I took the head bolts .... I know they look like 'zhit' but there's NOTHING wrong with them ... and you can't see them anyway ..... and put some oil in the cap, dipped my finder in it and lubed the shoulder of the head bolts, and the bottoms of them. I had already oiled the inside threads a couple of weeks ago by dipping an old cyl stud in oil and screwing that into the head bolts. 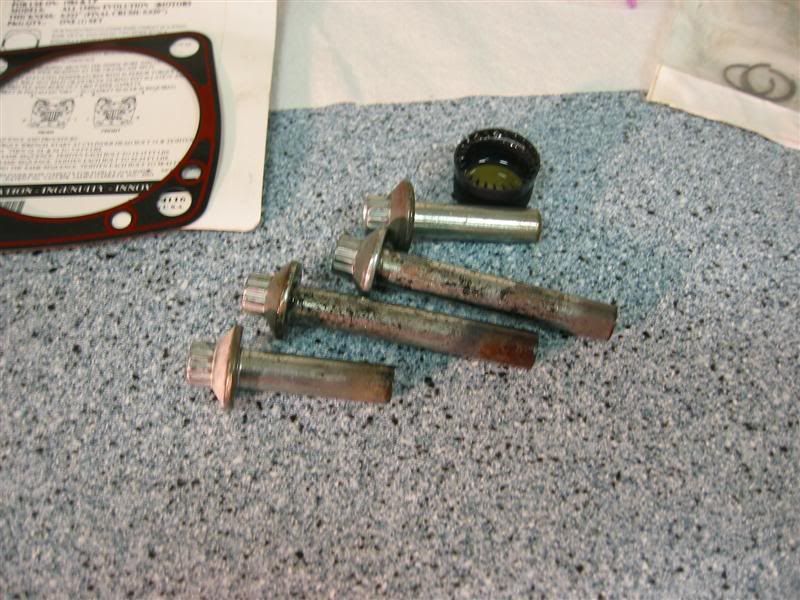 here she is with her first new head !!! I used James base cylinder gasket, and Cometic head gaskets. Both come with torquing instructions ... I followed the Cometic instructions and pattern. I've also decided that even I were to use stock HD head gaskets (but I would NEVER) that I'd still follow the Cometic torquing instructions.  ain't she PRETTTTTTY !!!!!!!!!!!!!!!!!!!!!!!!! here's the second one going on - you can see the wrist pin already started 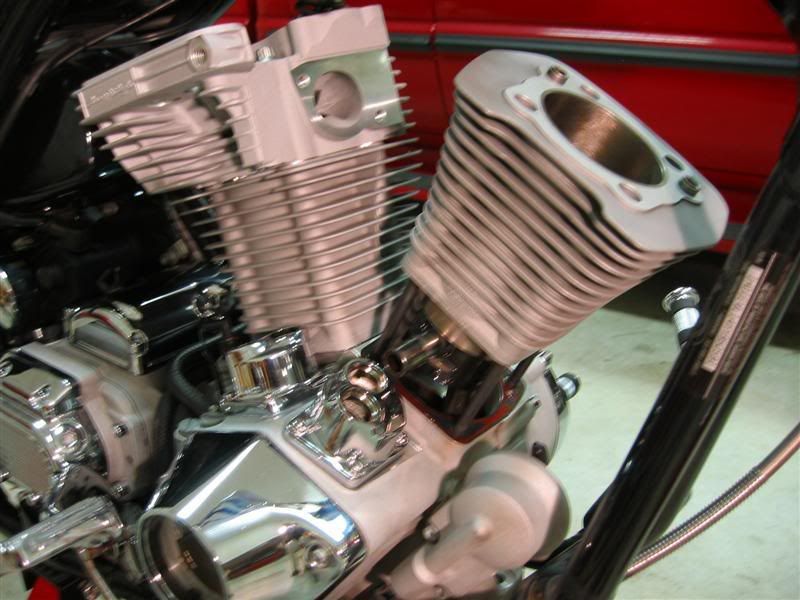 then, working from the other side, you can look into the hole for the wrist pin and align the connecting rod and push the wrist pin through ...... :-) Thanks again Steve !! It took a few maneuvers to get it aligned, but it was pretty straight forward and not difficult. You just have to hold the cylinder/piston, move it up and down, you might have to move the connecting rod, reach through to the other side with you other hand, and start pushing on the wrist pin .... once it starts to go in keep pushing on it until it seats up against the cir clip that was already installed on the work bench... 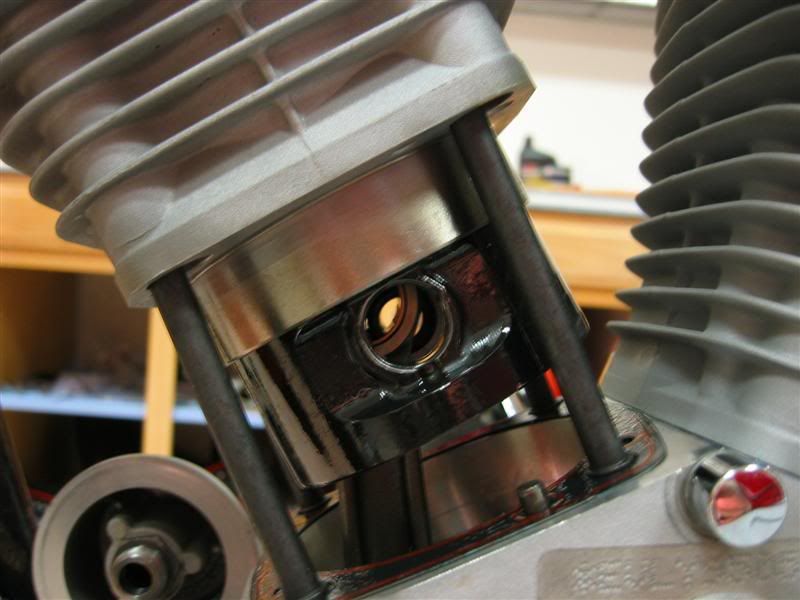 here she is with both of her new heads !!!!!!!!!!! I LOVE THIS BIKE !!!!!!!!!! She is BEAUTIFUL !!!!!!!!  so then I set about to install the intake manifold. If you do this step now, BEFORE you install the rocker boxes you'll have more room to work. here's the old seal coming out  here's a closer look at what the seals look like .... be sure to install the flange FIRST, and the bevel side of the seal goes 'in' towards the flange.  here's the loosely fit intake manifold .... got late, got tired, got cold ...... tomorrow is another day ..... 
__________________
Her badonkadonk ........ nuff said !!! States I've ridden my scoots in: Last edited by fxr4mikey; 03-02-2009 at 09:33 PM.
|
|
#114
03-02-2009, 09:28 PM
|
||||
|
||||
|
Nice work Mikey.
__________________
         Engine by Otto.
|
|
#115
03-02-2009, 11:08 PM
|
|||
|
|||
|
Mike, I am just beaming with pride! You are doing an absolutely awesome job!!
Well done, my friend!!
|
|
#116
03-02-2009, 11:21 PM
|
||||
|
||||
|
Quote:
Quote:
__________________
Her badonkadonk ........ nuff said !!! States I've ridden my scoots in:
|
|
#117
03-03-2009, 12:31 AM
|
||||
|
||||
|
Thanks for posting all of this in such detail Mikey! You are doing a great job on the build

|
|
#118
03-03-2009, 07:31 AM
|
||||
|
||||
|
Mikey;
Looking Good. Great pics. Did you already know what your deck height on the pistons was, or did you not need to check that? Just asking. Weather's looking good, except for Saturday. You gonna be ready? 
__________________
      Kimber     
|
|
#120
03-03-2009, 08:16 AM
|
||||
|
||||
|
Looking good Mikey! The pics look like they're right out of a manual...great job!
__________________
Stoney                 ALL WHO WANDER ARE NOT LOST.  GFFG
|
 |
|
|
 Similar Threads
|
||||
| Thread | Thread Starter | Forum | Replies | Last Post |
| Bike died, then started, then died, then started and ran OK......... | Geezer-Glide | Electrical Systems & Diagnostics | 13 | 05-17-2010 07:49 PM |
| First day at the build | Highmiles | Random Crap | 19 | 11-14-2009 11:35 AM |
| They Sure Don't Build 'em Like They Used To | d j | Random Crap | 14 | 10-02-2009 01:03 PM |
| The Great 103" Build <Or, Build #3> starts in the morning.......... | Geezer-Glide | Engine & Transmission | 46 | 04-23-2008 08:17 PM |
| new build | SeDeluxe | Engine & Transmission | 22 | 09-23-2007 10:26 PM |


 Linear Mode

